

Congratulations on choosing to play the oboe. The oboe is both a challenging and rewarding instrument to learn. Whether you are new to playing music, new to the oboe, or a parent of a music student, you will want to know these basics soon after receiving your instrument.
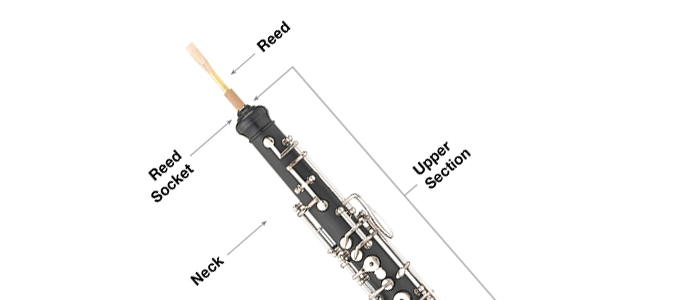
Parts of the Oboe

Click the image to zoom in.
Double Reed
While most woodwinds use a single reed, oboes use something called a double reed. The term double reed comes from the fact that there are two pieces of wood cane (or some other material) vibrating against each other to create musical notes.
Assembling Your Instrument
Your oboe is delicate and should be handled with care. Follow these instructions or the instructions given to you by your music director to prevent damaging the instrument.
- Soak the reed in ¾ inch of water for at 2½ to 3 minutes.
- Place the case on a flat surface and open right side up. Open the latches and carefully take out the instrument.
- When needed, apply a small amount of cork grease to each cork. Clean your hands after applying.
- Gently twist the bell onto the lower section of the instrument. Check to make sure the bell bridge keys are aligned.
- Carefully lift the upper section with your left hand using your fingers to press down the three large keys to raise the bridge keys.
- Carefully lift the lower section with your right hand close to the top. Do not press any keys on the lower section.
- Gently twist the upper and lower sections together making sure the bridge keys are aligned.
- Blow through the reed to remove excess water and carefully push the reed into the reed socket. Rotate the reed so that one flat side is aligned with the tone hole plates.
Below is a clip from Alfred Music going over these steps in detail. Alfred Music is the publisher of the popular Sound Innovations method book series, designed to help young music students succeed!
[su_youtube url=”https://youtu.be/uCTo04Q_MvE” width=”360″ height=”240″]
Putting It All Away
- Remove the reed and blow out excess moisture.
- Place the reed in a reed case. This helps it dry properly and last longer.
- Disassemble in reverse order of assembly. Use the swab to dry the inside of the instrument. Wipe off the outside with a soft cloth.
- Carefully place the instrument in the case and close all the latches.
- Store only your instrument and its accessories in the case. Sheet music, folders, and other objects may bend the keys and damage the instrument.
Related Articles
- How to Hold Your Instrument: Woodwind – Tips & Reminders
- 10 Care Tips for Woodwind Instruments
- 7 Tips for Practicing
- Practice Tips for Young Musicians
Have questions? Need advice? West Music is here for you! Give our school band experts a call at 800-373-2000.
Adapted from Alfred Music’s Sound Innovations for Concert Band 1: Oboe.
Special thanks to our partners at Alfred Music for providing us smartmusic® videos and additional materials.
Aaron Hansen is an experienced K-6 General Music educator, passionate about bringing music to life through the Orff Approach. He holds both a Bachelor’s and a Master’s degree in Music Education from the University of Northern Iowa. Aaron has completed comprehensive Orff Teacher Training, including three levels at the University of St. Thomas and an Orff Master Class. His dedication to the Orff method took him to the Summer International Course at the Orff Institute in Salzburg, Austria. Aaron also shares his expertise by teaching movement at various Orff Teacher Training Courses and conducting workshops for local Orff Chapters.


