


One of the reasons it’s so fun to watch great musicians perform is that they have such a beautiful connection with their instruments. Developing that special relationship with your flute, piccolo, clarinet or oboe begins with learning to hold it the right way.
What Every Woodwind Musician Needs to Know to Hold Their Instrument Properly
You want to hold your instrument, not grab or squeeze it. Keep your hands and arms relaxed, gently supporting the instrument’s weight. Don’t worry—never in the history of music has a flute tried to run away!
Place the pads of your fingers on the keys, not your fingertips. This is very important, because you will usually be placing your finger on a key with a hole, and you need to seal that hole. Even if you have a flute with solid keys, imagine there is a hole so you develop good technique.
How to Hold Your Flute or Piccolo
Flute

It is easiest to begin by holding the flute vertically, standing it on a table with the lip piece at the top and the keys facing forward (away from you). Place your left thumb on the B key—the long, narrow key facing you near the top of the flute. Counting downward from the top, place the pads of your left index, middle and fourth (ring) fingers on the second, fourth and fifth round keys on the front of the flute. Your left pinky will “float” off the instrument.
Now locate the lowest three round keys on the front of the instrument (not the larger ones farther down that are tilted toward the sides). Place your right index, middle and fourth fingers on those three keys. Let your right pinky rest on the “teardrop” shaped key below your fourth finger. Your right thumb should rest on the back of the flute, opposite your middle finger.
Now swing both your arms up and to the right, so that the flute is horizontal, and bring the lip piece to your lower lip. Your right thumb will support most of the instrument’s weight.
Pro tip: If keeping track of which key is which is confusing at first, simply pretend your cleaning rod is a flute and hold it up in playing position to get a feel for the basic hand positions.
Piccolo
You hold a piccolo exactly the same way as you hold a flute! The only difference is that a piccolo does not have a foot joint, so your right hand will be at the end of the instrument.
How to Hold the Clarinet or Oboe
Stand your clarinet or oboe up on a table with the keys facing forward (away from you). You will see a thumb hook facing you. Place your right thumb under that hook, the follow these directions:
Clarinet
On the back of the clarinet near the top, you will see an elongated key, and just below it, a round key. Place the pad of your left thumb on that round key. On the front of the clarinet, counting down from the top, place your index, middle, and fourth fingers on the second, fourth and fifth keys. Your left pinky can either rest on the instrument or hover just off of it.
Now place your right index, middle and fourth fingers on the lowest three round keys on the front of the clarinet. Your pinky will eventually be used on the two elongated keys just below your fourth finger, so for now, just let it rest lightly on one of them.
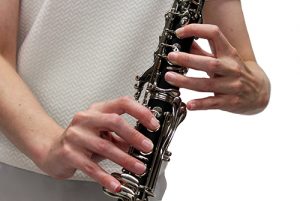
Oboe
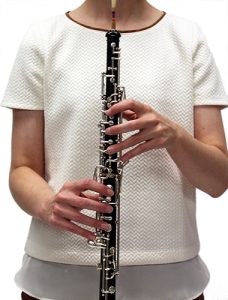
Near the top of the oboe, you will see three round keys with holes, with smaller, solid keys between them. Place the index, middle and fourth fingers of your left hand on the three keys with holes, skipping over the solid ones. Your left thumb should rest on the body of the instrument in back (facing you), tilted upward. Your pinky can rest on any of the three elongated keys below your fourth finger.
Farther down, you’ll see another set of three round keys with holes, just like the ones where you placed your left fingers. Place your right index, middle and fourth fingers on those three keys. Let your pinky rest on the lowest of the three elongated keys below your fourth finger.
Now simply keep the vertical orientation of your clarinet or oboe and bring it to your mouth.
Saxophone

First, attach your neck strap to the instrument and adjust it so that you will be able to easily bring the instrument to your mouth without hunching over or tilting your head. Locate the thumb hook near the bottom of the instrument and place your right thumb under it. Around the front of the sax, you should see three round keys in the area where you’ve placed your thumb. Rest the pads of your right index, middle, and ring (fourth) fingers on those three keys, with your index finger highest. Your pinky can rest on any of the elongated keys below your ring finger.
Now locate the round left thumb pad on the back of the sax, just below the octave key. On many saxophones, it will be black. Place the pad of your left thumb there. Around the front of the sax, find the uppermost round key and place the pad of your left index finger on it. Skip the very small round key and place your middle finger on the next full-sized key, then your ring finger on the round key below that. As with your right hand, your pinky can rest on any of the narrow keys below your ring finger.
Back-to-School Warm Up
If you have been playing a woodwind for a year or two but are reviewing these basics to get ready for school, you may also be interested in our song collections and play-alongs for woodwinds. For more tips and tricks about band instruments or to see student spotlights, keep reading the West Music blog.
Aaron Hansen is an experienced K-6 General Music educator, passionate about bringing music to life through the Orff Approach. He holds both a Bachelor’s and a Master’s degree in Music Education from the University of Northern Iowa. Aaron has completed comprehensive Orff Teacher Training, including three levels at the University of St. Thomas and an Orff Master Class. His dedication to the Orff method took him to the Summer International Course at the Orff Institute in Salzburg, Austria. Aaron also shares his expertise by teaching movement at various Orff Teacher Training Courses and conducting workshops for local Orff Chapters.


